From Bootstrapping to Acceleration: How Startups can Scale Sales

startups_scale_salesAs startups grow and evolve so does their sales team and along with each stage of growth comes different challenges. While each business is different, it is possible to be better prepared and take advantage of the learnings from other businesses, so that you can scale your sales team faster, better and stronger. Here’s an outline of the four key stages of a startup from inception to scaling, and the challenges they face along the way.

Stage 1 – Inception

Sales People:

0

Customers:

0 to 10

Product Stage:

Idea or prototype

Challenges:

Without any salespeople, at this stage, the business is just learning about the size of its opportunity and what its customers (or potential customers) may actually want. This is the customer discovery stage according to

Mark Birch, Investor & Entrepreneur

, with founders focused on building the product and determining if there is any interest in it. Many of the challenges from a sales perspective revolve around finding someone who is interested in your product, and in demonstrating to your potential customer your

passion for the product

.

Stage 2 – Testing

Sales People:

1 (most likely a founder)

Customers:

2 to 5

Product Stage:

Testing and validating the product

Challenges:

At this stage, you know you’re onto something but you’re still testing whether your solution is valid. While you may have only a few customers, your resources are tight so that’s all the business can manage at this stage, but you still want to get your product out to as many people as possible. So according to Terry Kelman, Director of Sales Enablement & Training at Senstay, “talk to anybody you will talk to you. Sell your product for any price you can get.” This may mean you’re giving your product away for free or make it Open Source to encourage testing.

It’s also critical at this stage to get feedback and open a conversation with your customers where possible. Think of it like market research which can be performed using analytical tools, that help you

discover symptoms in your sales process

(or product)  and identify where the issues lie.


Stage 3 – Sales Acceleration


sales enablement
Sales People:

2 to 3 (with perhaps one sales manager)

Customers:

30 to 200 (depending on the type of product)

Product Stage:

Testing and validating the product

Challenges:

With only a few salespeople, but the opportunity has proven, the real challenge according to Birch is, “to build a base of loyal, passionate and successful customers to establish credibility while preparing the startup for full-on growth.” As many customers at this stage are early adopters, they provide a source of low hanging fruit for salespeople.

The sales team is still quite unsophisticated in its approach according to Kelman. Prospecting is akin to a shotgun approach and the focus is on selling features and functions rather than customer value or needs. As resources are scarce at this point in the business’ development, “the types of skills needed during this phase differ from those needed to sell more mature products. Salespeople must be resourceful, able to develop their own sales models and collateral materials as needed,” observe

Mark Leslie and Charles Holloway

.

Stage 4 – Revenue Explosion or Scaling

Sales People:

10 to 100

Customers:

As many as possible

Product Stage:

Refining

Challenges:

The biggest issues for startup sales teams tend to arise at this stage. Perhaps the business has just closed Round B funding and investors want to see rapid growth. All bets have been laid and it’s now time to show the results, so most businesses start to hire. As Kelman points out, “What investors don’t understand is that a big increase in the sales force brings big problems for the sales manager”.

This is where startups need to ramp up what Leslie and Holloway call ‘The Sales Learning Curve’, with “the more a company learns about its product, market, and sales process, the more efficient it becomes at selling, and the higher the sales yield”. Sales managers need to look at how they hire, train and scale. As

Professor Mohanbir Sawhney

of Kellogg School of Management explains, “executives need to embed expertise into the company’s processes and structure to lessen its reliance on a few key people.”

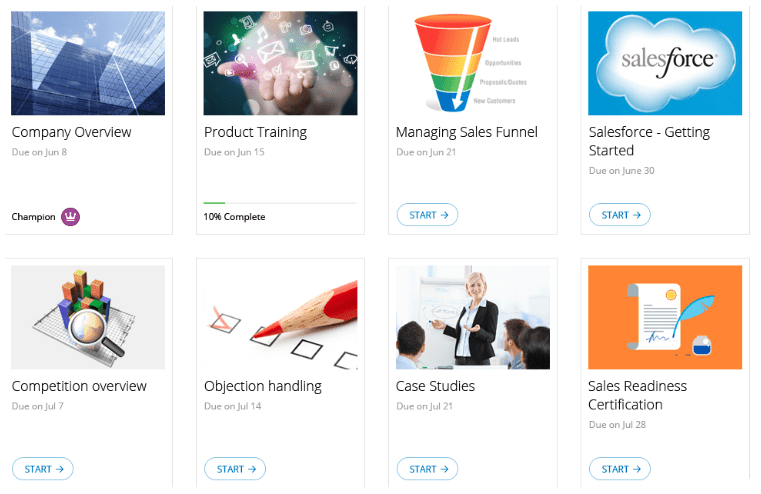
This is where sales training and enablement become a key factor that can make or break a startup. With strong training, agile processes and good collaterals, the business can rapidly bring on board new sales reps,

build trust in customers

and potentially have them selling at a rate that meets investors expectations. Another alternative that Swahney suggests is to “tap partnerships to access capabilities, technology, and customers.”
Regardless of how the startup decides to scale, the needs of their sales team will change considerably. Find out how to prepare your business to scale your dream sales team.

How to Convert Your Training Presentations Into Awesome Videos

how to make great videos
You can create interactive videos to engage your learners at a whole new level. In the age of interactive and gamified learning, the one obstacle Learning & Development teams face is the ability to convert the existing text-heavy content into an interactive video. The charge to hire professionals to make great videos is quite high and one does not always have the budget for these video professionals.

What if you could quickly create your own videos, right from your desktop? Surprised? Well, don’t be! Even you can create interactive videos which are short, crisp, to the point, and engage your learners at a whole new level. And guess what? There are many basic tools which are easily available on the internet that allow you to make great videos!

Let’s step through the process of creating a learning video of your existing presentation, with the help of these tools.

The Planning Stage

It is absolutely vital that you plan your conversion process first. This would help you avoid unnecessary “outtakes” and prevent you from pulling your hair out.

To get started, make sure you:

  1. Break down the content into small presentations which cover all the topics. Make sure each topic is a bite-sized one so that you don’t overwhelm your learners.
  2. Remember to use animations to strengthen your presentation. These will be very useful to focus your learner’s attention, something that you might have relied on a trainer to do in a classroom setting.
  3. Identify how you can test each topic at the end of the videos and also give them further material to explore. This will ensure that your learners’ interest is kept high even after the lesson has ended
  4. Prepare a script for the voice over that you will record when running the slideshow. You need to have a plan about what to talk about on each slide. It is as good as giving a live presentation in a training session. Make sure the narrative is as interactive as possible. Keeping it casual and having a sense of humor in the script is the way to go.
  5. Keep the video script short and crisp. A learner’s attention span is usually around 3 to 4 minutes, which is why the ideal length of a learning video should not be more than that.

Here is a sample plan for the narrative for a screencast to search for a product on Google.

Make great videos

The Execution Stage

Once you have the topic presentation ready, then starts the fun part! Download a screen recording tool

use camtasia to make great videos

The tool that we recommend (and use internally) is Camtasia. It has extensive features but is also extremely user-friendly. Camtasia even adds a plug into your MS Office PowerPoint, from which you can record your presentations with a single click. In case you do not like Camtasia, there are lots of screen recorders that can be found on the internet which include:

Download any one of the above, which will enable you to record your screen when you are running a presentation.

Record the Video:

To start recording the video, you will have to use the screen recording tool. Prior to recording, make sure you have adjusted the settings according to your requirements. This will save you a lot of headaches if in case something goes wrong!

adjust camtasia recorder to make great videos

Once you are ready with the settings, click the Record button and start the presentation.

Voice During Recording

A very common beginner’s’ mistake during recording videos is that we forget to pay attention to our own energy levels. During a classroom training, the trainers also feed off the energy of the learners, and hence it creates an energetic, interactive experience. But while recording a video, the trainer does not have the energy of the classroom to feed off of. Due to this, even his energy levels drop while recording. This is the surest way to create extremely boring videos.

There are many ways to avoid having low energy during the recording session. Some people have found coffee or energy drinks to be useful, whereas others might resort to standing during the sessions or even jumping up and down in between the recording to maintain their high energy levels.

Important tip: Voice modulation can be the most versatile tool you have while recording a video, to bring emphasis to certain points. Try to use this to your advantage! Even minor fluctuations can be very effective.

Put on the Editor’s Hat:

Now that you have finished recording the video, it’s time to wear the editor’s hat! No movie is recorded in a single shot. You do not want the video to be incomplete or miss its crispness. Let’s add some make-up before it goes live!

  • In Camtasia, once you are done with the recording, the first step is to set the video output resolution. For web purposes, the best practice is to use the dimensions of 1280 x 720 pixels. If you do not select this and choose a setting which is lesser, the video that will be generated will not be ideal for full-screen playback on today’s screens. This means that your text and images might be too small for the learner to read and comprehend.
  • A simple timeline with the recording tool allows you to edit the video. In case you are not happy with the current recording, you can go back and record only those parts and merge it to the current timeline.
  • In the editor, you can very easily trim the video, cut it, increase the voice pitch for certain sections, and even zoom into the video while explaining the important parts. These (and a host of other more powerful features) really put the finishing touches on your video.

The Publishing Stage

Now comes the time to cut, save, and call it a day!

Once you have edited the video, the last step is to save the file in the format most preferred by you. If you any text in your presentations, then the ideal output for the video is the HD option which gives you a high-quality output. However, this does create quite large video files. Hence, if you wish to lower your bandwidth costs, then you could go in for a lesser resolution format. But do make sure that the text in the video is readable for your learners!

Run the video past your teammates or users and collect feedback. Use the feedback when creating the next video!

Congratulations! You just recorded a video with no help from professional video makers. The number of people using this method to record videos is increasing by the day. Though we just focused on making videos through screen recordings, the other popular forms are getting a cam recorder and record the demonstration of you presenting on stage or on a blackboard. Once recorded, you can edit the video with the help of your favorite recording tool.

We certainly hope that you will be creating a lot more videos from your presentations now, and join the brigade of L&D professionals who are using video regularly in their courses.

How do you record your videos? Do you have any tips or tricks that you can share with our community? Do share with us in the comments below!


The Flipped Classroom Action Plan in Just 5 Easy Steps

flipped classroom in 5 steps
Companies that implement ongoing education for their employees are setting the stage for long-term success. Your employees need to upgrade and broaden their skills periodically as well as stay familiar with the latest industry trends, technology, and practices.
This can’t be understated. Technology evolves rapidly in most industries. Failure to maintain the skills needed to succeed, makes it challenging for employees to perform their duties with any degree of productivity.

The reality of implementing ongoing training consistently with sales reps in the field, customer service agents on the go and busy remote employees, is an entirely different story altogether…

The flipped classroom approach presents a highly scalable way of making an ongoing training program a reality for any business that needs to keep employees up to date. The premise behind the flipped classroom is to create an environment where the lecture and homework aspects of your course are reversed. Today’s employee, more tech-savvy than ever before, is used to consuming learning content online. This enables trainers or managers to spend time in class engaging in discussion, applying concepts and answering employee questions.

In 4 Signs You Should Invest in a Flipped Classroom, we gave you a few questions to consider for an investment in the flipped classroom approach. Here is step by step tips on how to develop and implement the flipped classroom for your organization.

Action Plan for Developing Your Flipped Classroom Training

  1. Start By Setting Objectives – It’s important to know your objectives before you start designing a plan. Set the end objectives you want to achieve with your training program. For example, assume a bunch of new sales hires are joining soon. Objectives of the training could be focused on getting the sales reps prepared on buyer personas, buying habits, customer pain points and how your product addresses the customer’s needs. In addition, objectives could also cover how your product solves the customer’s problem and the positive impact.
  2. Develop a Training Plan – Once you identify what outcomes are needed from the learning activity, decide on the optimal mix of training content for your organization and develop an outline. Create a training structure based on your objectives and priorities. Then, identify topics that go inside each of the training elements.

Mindtickle Sales Onboarding Course Example

Mindtickle Sales Onboarding Course Example

Note that there is no one size fits all solution. Instead, customize your approach to every topic keeping in mind the opportunity for pre-work. You want to first have employees experience the learning activity on their own, then come to the classroom prepared for discussion.
3. Prepare Content for the Training –  Video is an excellent medium for delivering the flipped classroom approach and preparation will reduce the amount of time it takes to produce the videos. (Unless you are an improv whiz!). For example in sales onboarding, simply record your “A player pitch” for a highly engaging demo to use in your training.
As you review content, look at your objectives and include data that makes for a good introductory overview along with seminal concepts. Every topic in the Analytically evaluate if your training content will meet the objectives.
Repurpose PowerPoint presentations into smaller presentations covering the topics. Script out your presentations from slide notes. Make sure each topic is a bite-sized one so that you don’t overwhelm your employees!
Recording video is much easier than you may think. You can use your mobile phone to record videos and use simple tools to do basic editing. A parting thought on video – resist the urge to be a perfectionist when recording or editing. When delivering live training there are bound to be mistaken here and there. It’s no different with video so don’t worry about small errors!
4. Implement the Flipped Classroom – When your employees go through the course online and come back to the classroom for an effective face-to-face session, it is even more critical to foster a team of intrinsically motivated employees. Having the right incentives in place will allow you to run a successful training with enthusiastic employees. Deliver the in-class discussion questions for each topic ahead of time. Let your employees know that they should prepare for in-class conversation and questions by sharing a structured learning plan with them upfront and explaining your ground rules and expectations about participation.  It is critical that they understand that those who come to training having completed the lesson, engaged and ready to ask questions to get far more out of the experience those are unprepared.
5. Evaluate Training Results – The next step is to evaluate (through an assessment) the efficiency of the training. The analysis of the training report will give you information on knowledge gaps on which your employees can be coached in the face to face session. It is important to seek feedback from your employees and deliver quizzes and assessments to ensure that you are on track to meet objectives. If some videos are not effective, find out what is effective! Finding out what works may take some time. Once the flipped training is complete deliver a final assessment to evaluate knowledge. Now your employees are prepared to do their job efficiently!
With the flipped classroom it is important to remember that the experience can be as much of a learning experience for you as a trainer as it is for your trainees. No doubt there is a learning curve and there may also be some resistance as you make the shift away from more traditional approaches to the flipped classroom model. Give the flipped classroom a chance and keep iterating to meet your organization’s goals!
What do you think about the flipped classroom approach?

Mike Kunkle on Sales Onboarding (Part 1)

Mike Kunkle Sales Onboarding

So you just hired a new salesperson? For many businesses, the ramp-up time for new sales reps is typically six months or more. With turnover being slightly less than two years for most reps, companies need to have a solid onboarding plan in order to realize a return on their investment. An outdated or overly labor-intensive sales onboarding program leads to increased turnover and wasted company resources.

sales onboarding ramp up times

Source: via Mike Kunkle, Sales Onboarding: Twice as Good, Half the Time

Sales onboarding isn’t just about going through pitch videos or having new reps shadow tenured sales reps. Not only should your sales onboarding have a clearly defined objective and end goal, your sales reps also need to know the milestones that they need to achieve to be successful. Your new salesperson has potential, but that potential is only unlocked with a structured onboarding program. For advice on what excellence in sales onboarding looks like, we turn to Mike Kunkle, a recognized leader in sales training and organizational effectiveness. Mike shares actionable steps you can take to help accelerate ramp-up times and reduce turnover.

What are the pressures and trends that sales managers must contend with today?

Mike Kunkle: The pressure is still all about the number… making your sales quota. It’s the environment that’s changed. Due to information available online, with a few clicks, today’s buyers are doing their own research before reaching out to suppliers. Buyers are more informed than ever – although not always more accurately informed.
Along with these changes in buyer behavior, there are more RFPs than ever before and more decision-makers involved. For instance, the average number of buyers involved in a complex sale is 5.4 (according to CEB). If that’s the average, there are some that have even more buyers involved.

Tweet This: “The pressure is still all about the number… making your sales quota.”

Then there are factors like corporate cost reductions that result in shrinking training departments and budgets, making it more difficult to serve our sales forces.  To further complicate things, even in this day and age of big data, many still roll the dice when we hire and select sales reps on gut feel.

Bottom line is that the expectations placed on sales managers are enormous, and often organizations pull them in far too many directions, rather than removing obstacles to allow them to focus on hiring, training, coaching, and managing their teams as effectively as possible.

You said: “It takes many companies from 7 to 12 months to ramp-up their new sales reps.” Why is sales reps ramp time moving in the wrong direction?

Mike Kunkle: If you look as far back as 2003, which I did recently for an article I was writing, ramp-up times were shorter. “Ramp up times have generally gotten longer over the years. There’s variance, but if you trend-line the data, we seem to be headed in the wrong direction. There could be quite a few reasons for that, though, including a more complex, competitive business environment, a shift toward the buyer’s market, and/or an increase in complexity of problems, opportunities, and solutions to address them, or even some year-to-year difference in research protocol or other speculative reasons.”

Selling was a lot less complex than it is today, and to a large degree, it’s because there wasn’t a proliferation of information on the Internet. It was before buyers were doing so much research on their own.

Combine that with a drain on training department budgets and sizes, in comparison to the early 2000’s, and how much new reps need to learn to be productive, and it’s not hard to imagine why onboarding remains a sales challenge.

Question: What can be done to accelerate sales rep ramp time?

Mike Kunkle: I’d start by defining outcomes. When you say accelerate, is that just a faster time, or is it higher productivity in the same time, or both shorter ramp-up time with higher productivity? The first thing is to get clarity around what you want and benchmark where you are, so you have a measuring stick to gauge your progress. Put a stake in the ground saying, “This is where we are today.” Then ask yourself: “where are we aiming and what are we trying to do?”
When companies actually try to shorten their ramp up time, many of them are actually deterring productivity as opposed to enhancing it. There’s an awful lot of five days of death by PowerPoint in orientation and onboarding.

Tweet This: “The sales job has become increasingly complex.”

We need to step back and apply some sound instructional design thinking, stuff that has been around since the dawn of time. Analyze top producer practices and really try to understand what are the differentiating factors between top and mid producers. Then document the best practices in your organization.

The best practices give you a real focus on what are the things that are making a difference. When you’re developing content or teaching content to new people, you know what you’re teaching gets results. This is where hard core prioritization and decisions need to be made. What are the absolute need-to-know and need-to-do things to achieve sales rep productivity?
For example, three common goals I’ve used in some businesses include:

  1. making their first sale,
  2. achieving their first monthly quota,
  3. and then making quota 3 months in a row.

These goals won’t work for every business. They have to match reality, and when achieved, they signify that the employee is truly ramped-up and a fully-productive sales rep. The concept sounds simple but it is far from easy… People struggle most with the NEED to know vs. NICE to know piece.

You also want to have ways to reinforce what is taught such as job aids, places to get answers, buddies or mentors, and plenty of follow-up and coaching from either specialized onboarding coaches or sales managers.

Check back for part 2 of our interview on sales onboarding with Mike Kunkle. We’ll cover common mistakes training managers make in sales onboarding as well as actionable advice and best practices.

You can see more of Mike’s thoughts about sales onboarding at http://bit.ly/SalesOnboardingLI

Mike KunkleMike is a training and organizational effectiveness leader with special expertise in sales force transformation.
After his initial years on the frontline in sales and sales management, he spent the next 21 years as a corporate manager or consultant, leading departments and projects with one purpose – improve sales results.

Today, in his role as commercial training & development leader for a Fortune 10 corporation, Mike uses his in expertise in best-in-class learning strategies, methods, processes, and change leadership to develop the capabilities of sales representatives and sales managers to drive business results.

Mike freely shares his own sales transformation methodology, speaking at conferences and writing online (see http://slidesha.re/PerfLevers082011  and http://bit.ly/EffectiveSalesLearningSystems as examples) and can be reached at <mike at mikekunkledotcom>, through his blog at http://www.mikekunkle.com, or on various social media sites.